Amazon Athena
Amazon Athena allows users to use SQL to query data stored within AWS’s S3 storage service. Many datasets, including Wharton’s Corelogic Databases and the Dataset of Historical Tweets, are accessed using Amazon Athena. In addition, the Research-IT team often utilizes the Athena service to provide a consistent SQL interface for researchers when assisting with managing and using their large datasets.
This page describes the different ways to query data using the Athena service. The guidance should generally apply to all datasets that Research-IT has provided access to through Amazon Athena.
Contents
- Important Athena Usage Notes
- Web Browser Access
- Configure HPC3 Access
- Using HPC3 and isql To Query Athena
- Using HPC3 and Stata To Query Athena
- Using HPC3 and Python To Query Athena
- Using HPC3 and R To Query Athena
Important Athena Usage Notes
Before using Amazon Athena, it is helpful to understand how the service is set up so that you can properly design your queries.
Workgroups
When querying Athena, you will need to set a workgroup, which will be created for you by Research IT when you are granted access to Athena. A workgroup is a way that Athena organizes and separates the queries of different users. Typically, each user will have their own workgroup, and each workgroup will have its own storage space to store the results of queries. This setup ensures that your queries remain private to your account and allows you to reuse query results using your web browser to access Athena. The guide below will describe how to set up your workgroup. Note that query results are automatically deleted after 30 days.
Database and Table Structure
Athena organizes data into tables that are located within databases. When querying Athena, the table naming convention is “database_name.table_name“, where the database name is separated from the table name with a period.
Your Athena account may have access to multiple databases, so you need to denote the database name when writing your queries. In the examples below, the database name is “tweets_database,” and the table name is “tweets_table,” so you’ll see “FROM tweets_database.tweets_table” used frequently in example queries.
Cost of Queries
The cost of running queries is $5 per terabyte of data scanned, prorated to the amount of data that is actually scanned. In other words, for every terabyte of data that Athena scans to complete a query, AWS will charge $5. This is charged to the billing code you provided when requesting access to many databases.
For example, let’s say the total size of a database you are querying is 2 TB. And you run the following query:
SELECT * FROM my_database;
The above query selects all the data from my_database, which is 2 TB of data. Therefore, the cost of the above query will be $10.
However, let’s say you query only the columns you need from the database:
SELECT id, price, period FROM my_database;
If the above query is only 10 GB of data, then the cost of the query will be less than $0.05.
Note: It is important to limit your queries to just the data that you need. “SELECT *” is rarely a cost-effective query.
Note: Each workgroup has a default maximum query limit of 1 TB scanned per query and a maximum of 1 TB scanned per 12 hours. These limits are to limit accidental runaway costs.
Web Browser Access
The following instructions describe how to access datasets using your web browser and the Amazon Athena web console. These instructions are also available in the PDF quickstart guide you may have received when granted access to a dataset.
- Log into the AWS console
Go to https://aws.cloud.upenn.edu and log in using your PennKey. If you are taken directly to AWS, you may skip to the next step. If you are taken to a page where you must select an account/role to sign into, select the role and account corresponding to the dataset you wish to access. Then click the Sign In button at the bottom of the page. Check your PDF quickstart guide for more information about the role and account name, if needed. - Access the Amazon Athena service
Once you have logged into the AWS console, you will see a search bar in the top left, along with information about your username and the account you have logged into in the top right. Select the search bar and search for Athena. The Athena service should automatically appear at the top of the results. Select the Athena result under Services. (Figure 1)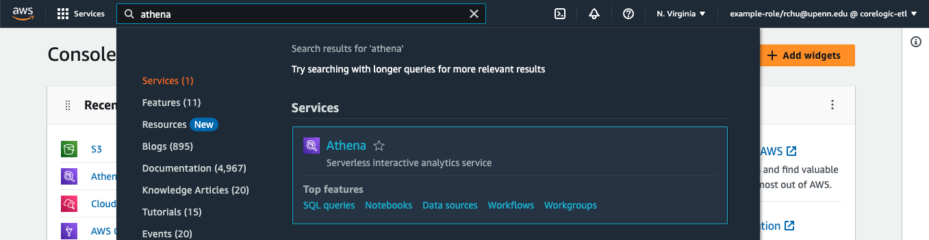
Figure 1. Type “Athena” into the search bar and select the Athena service to access the Athena web console. You should now be in the Amazon Athena query editor. If you do not see the query editor, there should be an orange button to the right of the page that says “Launch query editor.” Select that button to access the query editor. (Figure 2)
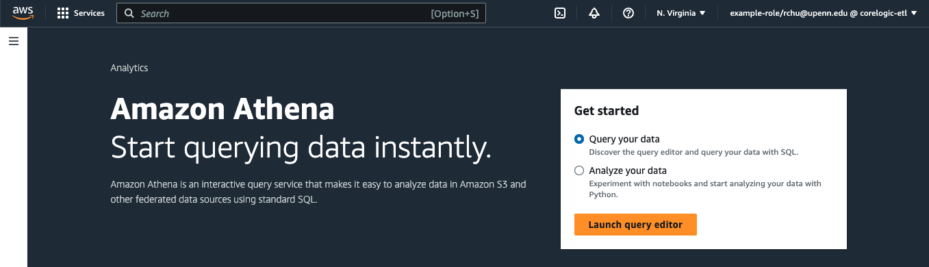
Figure 2. Select the orange “Launch query editor” button to enter the query editor. - Set your workgroup
When you enter the query editor for the first time, you may be prompted with some errors at the top of the screen. These errors will be resolved once you set your workgroup. You should only need to set your workgroup the first time. First, ensure that in the upper right-hand corner of your screen, your AWS region is set to “N. Virginia.” (Figure 3)
Figure 3. The green circle highlights the AWS region selector. If the region is not “N. Virginia,” select “N. Virginia” from the list. In the upper right-hand side of your screen, you should see a textbox labeled “Workgroup,” likely with the value “primary.” Select the textbox and replace the value with the name of your workgroup. Typically, the workgroup name is your PennKey, followed by “-group.” For example, rchu-group. Check your PDF quickstart guide for your specific workgroup name.
After entering your workgroup, a pop-up prompt will appear. Select the “Acknowledge” button. (Figure 4)

Figure 4. After entering your workgroup name, you will be prompted to select “Acknowledge” to complete the selection of your workgroup. - Run your queries
You can now run your queries in the Athena web console. Query results are saved to AWS S3 and are typically automatically deleted after 30 days. See your PDF quickstart guide for more information.
Configure HPC3 Access
Amazon Athena is accessible through the HPC3 using an ODBC connection. Please refer to your PDF quickstart guide for instructions on configuring your ODBC connection in your HPC3 account. This configuration should only need to be created once and be carried over to future HPC3 sessions. Each separate dataset you can access will need its own ODBC configuration.
Below is an example configuration block for an ODBC connection. The actual connection name in the example is “ExampleConnectionName,” which is the string between the square brackets at the top of the configuration block. For your ODBC connections, you can change the name as you please, but it is best practice to avoid spaces and special characters. The connection name will be used when querying your database.
[ExampleConnectionName]
Description             = Twitter AWS Athena Connector
Workgroup               = example-workgroup
Driver                  = /usr/local/athenaodbc/lib/64/libathenaodbc_sb64.so
AwsRegion               = us-east-1
S3OutputLocation        = s3://edu-upenn-wharton-randa-tweet-enhanced-results-example
AuthenticationType      = IAM Profile
AWSProfile              = wharton-tweet-collection-example-role
If you don’t have an HPC3 account, you can visit this page to see if you qualify for an account. Please visit this page for guidance if you need instructions on accessing your HPC3 account.
Using HPC3 and isql To Query Athena
Once you have configured your ODBC access on the HPC3, you can use the isql command and your connection name to query Amazon Athena and save the results to your HPC3 account. Using isql, you can also submit your queries as HPC3 jobs that run on the cluster.
Note: Before running your query, authenticate with AWS using the aws-federated-auth tool on the HPC3. You should only need to authenticate approximately once every 12 hours.
Running Queries Interactively
To run queries interactively, you must use a compute node, not a login node. The isql command does not work on login nodes.
After logging into the HPC3, activate a compute node using the following command:
qlogin -now no
If you have not authenticated into AWS, please run aws-federated-auth now. At this point, you can enter the interactive mode of isql and connect to your database by using the following command and replacing “ExampleConnectionName” with the name of your ODBC connection:
isql ExampleConnectionName
Now, you can run SQL queries as you please. Once you finish your interactive queries, exit isql by typing “quit.”
Running Queries as HPC3 Jobs (And Saving Results)
You can also use qsub and isql to submit queries as HPC3 jobs that save results to a text file. See this page for detailed information about submitting HPC3 jobs using qsub. See this page for detailed information about using the isql command.
Note: You must run aws-federated-auth to authenticate into AWS before submitting your queries as jobs. You should only need to authenticate once every 12 hours.
To submit single-line queries as jobs, you will want to create a shell script file containing your query and output location. The following code block is an example script:
#!/bin/bash
#$ -N athena_query
#$ -j y

echo "SELECT id, name, text FROM tweets_database.tweets_table LIMIT 10" | isql ExampleConnectionName -b -d"|" -c > results.psv
Replace the query after the echo command with the query you want, replace ExampleConnectionName with the name of your ODBC connection, and replace results.psv with the path to the file to which you wish to have the results saved. The above code block will output the query results as a pipe-delimited file. If you want a CSV instead, you can change the flag to -d”,” from -d”|”.
To submit multi-line queries as jobs, you will need to create a slightly different shell script file. The following code block is an example script:
#!/bin/bash
#$ -N athena_query
#$ -j y

echo """
SELECT
    id,
    name,
    text
FROM tweets_database.tweets_table
LIMIT 10
go

""" | isql ExampleConnectionName -b -d"|" -c -n > results.psv
Multi-line queries must end with the word “go” and an extra blank line. The isql command also requires the extra -n flag.
Using HPC3 and Stata To Query Athena
Once you have configured your ODBC access on the HPC3, you can use Stata on the HPC3 to query Athena directly. As always, you must authenticate into AWS using aws-federated-auth before connecting to Athena through Stata. See this page for detailed information on how to use Stata on the HPC3.
Querying Athena directly within Stata allows you to load the results of SQL queries into memory as a Stata dataset. The following code block is an example of a Stata do-file that would query Athena and load the data into memory within Stata.
set odbcmgr unixodbc
odbc load, exec("SELECT id, name, text FROM tweets_database.tweets_table LIMIT 10;") dsn(ExampleConnectionName)
In the code block above, replace the SQL query in the exec() option with your desired query, and replace “ExampleConnectionName” with the name of your ODBC connection.
Using HPC3 and Python To Query Athena
Once you have configured your ODBC access on the HPC3, you can use Python on the HPC3 to query Athena directly. As always, you must authenticate into AWS using aws-federated-auth before attempting to connect to Athena through Python. See this page for detailed information on how to use Python on the HPC3.
There are multiple ways to query Athena using Python. The guide below describes two ways: using pyodbc and using awswrangler.
Using pyodbc
After setting up your virtual environment, install the package pyodbc. Ensure that you are in your virtual environment and on a compute node.
python -m pip install -U pyodbc
You can now use pyodbc and your ODBC connection name to query Athena directly using Python. The following code block is an example of a Python script that uses pyodbc to query Athena. Official documentation for pyodbc can be found here.
import pyodbc
with pyodbc.connect(dsn="ExampleConnectionName") as dbh: # Replace ExampleConnectionName with your ODBC connection name.
    cursor = dbh.cursor()
    res = cursor.execute("SELECT id, name, text FROM tweets_database.tweets_table limit 10;")
    headers = [col[0] for col in res.description]

for row in cursor.fetchall():
    print(dict(zip(headers,row)))
As always, replace the SQL query with your desired query, and replace ExampleConnectionName with the name of your ODBC connection.
Using awswrangler
After setting up your virtual environment, install the package awswrangler. Ensure that you are in your virtual environment and on a compute node.
python -m pip install -U awswrangler
To use awswrangler, you will need the AWS Profile name and your Workgroup name from the ODBC connection configuration. In our above example configuration, the AWS Profile name is “wharton-tweet-collection-example-role,” and the Workgroup name is “example-workgroup.” You can also find the AWS Profile name in the first column of the output from running aws-federated-auth.
Before running a Python script with awswrangler, you must set an environment variable with your AWS Profile name to enable Python to connect to Athena. Run the following command while replacing wharton-tweet-collection-example-role with your AWS Profile name.
export AWS_PROFILE=wharton-tweet-collection-example-role
You can now use awswrangler to query Athena directly using Python. The following code block is an example of a Python script that uses awswrangler to query Athena. Note that awswrangler uses pandas and automatically creates dataframes from the query results. Official documentation for awswrangler can be found here.
import awswrangler as wr

df = wr.athena.read_sql_query(
    sql='SELECT id, name, text FROM tweets_table LIMIT 10;',
    database='tweets_database',
    workgroup='example-workgroup', # Replace example-workgroup with your workgroup name.
    ctas_approach=False # This setting is preferred as your account may not have permission for other approaches.
)

print(df.head(10))
As always, replace the SQL query with your desired query. You will also need to replace the database name with the database you are querying and the workgroup name with your workgroup name.
Using HPC3 and R to Query Athena
Once you have configured your ODBC access on the HPC3, you can use R on the HPC3 to query Athena directly. As always, you must authenticate into AWS using aws-federated-auth before attempting to connect to Athena through Python. See this page for detailed information on how to use R on the HPC3.
For R, you will need to install the ODBC library RODBC:
install.packages("RODBC")
Then, you can query Athena directly within R. The following code block is an example of an R script that queries Athena. Official documentation for RODBC can be found here.
library("RODBC")
ch <- odbcConnect("ExampleConnectionName")
sqlTables(ch)
res <- sqlQuery(ch, "SELECT id, name, text FROM tweets_database.tweets_table LIMIT 10;", max = 10)
write.table(res, file="example.RData")
As always, replace the SQL query with your desired query, and replace ExampleConnectionName with the name of your ODBC connection.